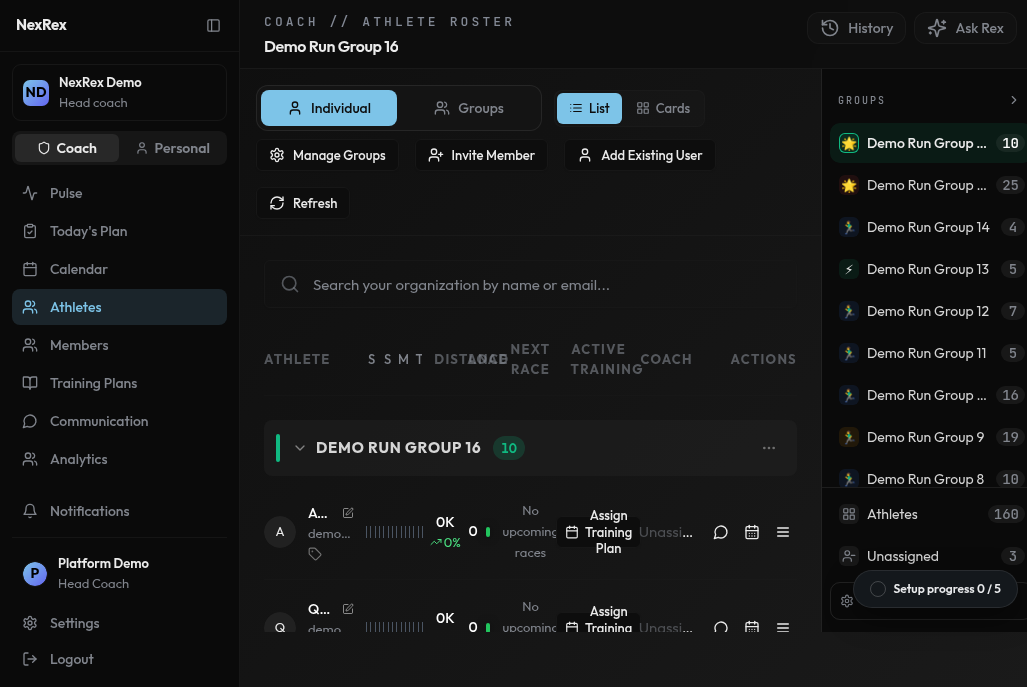
The athlete roster in list view shows recent activity, distance, load, next race, and active training for every athlete.
Invite athletes
From the Athletes page, click Invite Athlete to open the invitation dialog. It has two tabs, and both create athlete (member) invitations:- Invite link — share your team’s public member invite link, with a QR code and copy-to-clipboard.
- Email — send a named email invitation to a specific person, with optional group assignment and starter plan.
Invite by link
The Invite link tab is the default. It shows your organization’s existing public member invite link, so reopening the dialog does not create hidden extra invitations. If there is no active link yet, click Generate invite link to create one. New links are valid for 7 days and up to 100 uses. Once a link exists, the dialog shows:- The full invite URL in a read-only field.
- A QR code the athlete can scan in person — handy for a first team meetup.
- A live Time remaining countdown in
hh:mm:ss. Copy link is disabled once the countdown reaches zero or the link has been used 100 times. - A Copy link button that writes the URL to your clipboard. If your browser blocks clipboard access, select the URL field and copy it manually.
Invite by email
Switch to the Email tab to send a named invitation instead. Fill in the athlete’s first name, last name, and email, optionally assign them to a group or a starter training plan, and send. This is the same email-invitation form that was previously the only way to invite athletes from this page. When the athlete accepts an email invitation, NexRex assigns them to you (the inviting coach) in the same transaction that creates their organization membership. They show up on your roster and on your Today page right away, without a separate assignment step. Existing coach assignments are preserved: if the athlete already has a coach in the organization, invitation acceptance never overwrites that assignment.Public Invite link signups don’t carry an inviting coach, so athletes
who join through a shared link aren’t auto-assigned. Assign them from the
Assigned coach column on the roster after they join.
Approve pending requests
If your organization allows self-serve join requests, incoming requests appear in the Pending Requests panel with Approve and Reject actions per request. Approving adds the athlete to your roster immediately; rejecting discards the request.Organize your roster
Group athletes into squads or sub-groups to assign plans and review progress in bulk.Switch between individual and group view
The Athletes page has a View switch beside the title with two modes: Individual and Groups. Your choice is remembered per coach, so the page reopens in the mode you last used.- Individual — the roster table described in The Athletes roster below.
- Groups — one card per group. Use it when you coach by squad and want a per-group overview instead of a per-athlete table.
- The group’s cover photo (set from the group form — see Create a group), icon, and name.
- Member and coach counts.
- The group’s featured active plan with the current week index (for example W3 / 12), or No active plan if none is assigned.
- Three quick actions: Status opens the group’s overview, Plan opens the active plan (Assign plan appears instead when the group has none), and Activities opens the group’s activity feed.
The Athletes roster
In Individual view, the roster shows each runner as a row with the following columns:- Athlete — profile image, or the athlete’s first initial when no image is set.
- Recent activity — latest logged workout.
- Distance — running distance for the current window.
- Load — training load for the current window.
- Next race — the athlete’s next major race, if one is scheduled.
- Active training — the athlete’s currently active plan. If they have more than one active plan, the extra count appears below the plan name. If they have no active plan, an Assign Training Plan button appears in the cell so you can assign one without opening the profile.
- Assigned coach — the coach responsible for the athlete. Head coaches can click this cell to assign, replace, or unassign the coach.
- Actions — per-row quick actions (see below).
Per-row quick actions
Each roster row exposes three actions on the right:- Chat — open a direct message with the athlete.
- Calendar — jump straight to the athlete’s calendar.
- More actions — a menu with the rest of the athlete controls, including group membership, view profile, and remove athlete.
Assign a plan
You have two ways to assign a training plan:- From the Athletes roster, click Assign Training Plan in the Active training column for any athlete who does not yet have an active plan.
- From an athlete’s profile, assign an individual training plan or add them to a group plan.
Draft a plan for an athlete with Rex
When you ask Rex in chat to build a full training plan for one of your athletes, Rex replies with a Plan Builder hand-off card instead of drafting the plan inline. Click the card to open Plan Builder pre-scoped to that athlete, carrying your original ask as the seed message. Inside Plan Builder, once the draft is ready, you have two save modes:- Save as template — stores the plan as a training plan template you can reuse or assign later.
- Save & assign — saves the template and immediately assigns it to the athlete so it appears on their calendar.
Edit a personal plan’s description
Open a personal training plan and click the More actions (⋯) button next to the plan name. Choose Edit description to update the summary shown under the plan name, then click Save. The updated description is saved through the same plan update path as rename and archive.Removing an athlete from your roster also removes their scheduled sessions tied
to your plans. Their personal account and history stay intact.
When an athlete leaves your team
Athletes can leave your organization on their own from Settings → My teams in the NexRex app. When an athlete leaves:- You and the other coaches in the organization lose access to their data.
- NexRex removes them from the organization’s groups and group plans.
- The head coach and the athlete’s assigned coach each get a member left notification in their inbox.
Move or copy workouts on the plan calendar
You can rearrange a plan directly on its calendar by dragging workout cards between days:- Move — drag a workout and drop it on any day cell to reschedule it, including across weeks.
- Copy — hold Option (Alt on Windows) while dragging. Dropping creates a copy on the target day and leaves the original in place.
Copies of completed workouts keep the original prescription
Once an athlete completes a planned session, its calendar card reflects the actual activity. Copying a completed or merged workout still copies the coach-authored prescription: the original name, distance and duration targets, pace targets, and workout content. The athlete’s recorded metrics are never carried into the copy, so duplicating a past week reproduces the sessions you originally wrote, not what the athlete happened to run. This behavior applies on both individual plan calendars and group plan calendars.Lock a week on an individual plan
You can lock a specific week on an athlete’s individual training plan to hide its workouts until you’re ready to release them. Open the plan calendar and use the lock control on the week header to lock or unlock. The manual lock works on every individual plan. This includes plans you assigned without locking future weeks by default.- A locked week hides its workout details from the athlete. The athlete still sees a summary of the week: the number of workouts, total distance, and total duration.
- A locked week shows a lock icon on the athlete’s mobile calendar for that week.
- Unlocking a week sends the athlete a push notification. Locking is silent.
- The athlete’s mobile app refreshes the plan automatically. Foregrounded apps update within seconds; on iOS a backgrounded app may not update until it is opened again.
Weekly adjustment review modes
When Rex proposes a weekly plan adjustment for one of your athletes, the proposal comes to you, not the athlete. You get the proposal-ready notification, the athlete sees the pending adjustment as read-only, and your decision is what applies or dismisses it. See Reviewing a proposed adjustment for the athlete-side view. Your review mode controls what NexRex does when a proposal reaches its review deadline without your decision:
The default is
auto_after_window, which matches the behavior before review
modes existed. Auto-applied changes are never attributed to you; only
proposals you approve carry your name.
Per-athlete overrides
You can set a different mode for individual athletes. An override takes precedence over your base mode, so you can delegate most of your roster while reviewing every change for an athlete returning from injury.Configure your review mode
The coach console’s Adjustment review card sits next to your review queue on the Coach dashboard. Pick one of the four modes above; the card shows a plain-language sentence under each option so you can see what it commits to at the deadline. The mode you choose applies to every athlete on your roster who doesn’t have an override. To set a per-athlete exception, use the Per-athlete exceptions section on the same card:- Pick an athlete from the roster picker.
- Click Add to create an exception.
- Choose the review setting you want for that athlete.
- Click Remove to delete an exception and return the athlete to your default mode.
Coach API
The same settings are also available through the coach API. Read your current settings withGET /api/v1/coach/adjustment-review-settings and update them
with PUT on the same path:
adjustment_review_mode_overrides replaces
the whole override map, so include every override you want to keep. The
response echoes your resulting settings in the same shape.